
 Writing and maintaining custom integration with smart devices, or enabling smartness
in existing ones if possible, takes time. It’s not so bad if the device
has an open, documented interface. Things tend to get more tricky if you have to
analyse the network traffic and mimic it with your own code. It’s a
great adventure with many learning opportunities but, if you want results fast,
there are better ways to go.
Writing and maintaining custom integration with smart devices, or enabling smartness
in existing ones if possible, takes time. It’s not so bad if the device
has an open, documented interface. Things tend to get more tricky if you have to
analyse the network traffic and mimic it with your own code. It’s a
great adventure with many learning opportunities but, if you want results fast,
there are better ways to go.Market currently consists of thousands smart devices, with hundreds new ones becoming available each day. Integrating them all by yourself is an uphill battle. Thankfully, open-source community is helpful, providing us with tons of libraries talking with smart devices. Community goes even one step further, creating platforms that do aggregate those libraries under coherent interface. The Home Assistant is one of such projects, and in this article we will install, configure and secure it on Raspberry.
Action plan

We are going to start with installing Home Assistant on the Raspberry. For that we will use Docker, to avoid installing every dependency directly on the host. Then, we will secure Home Assistant using OAuth2Proxy for HASS, allowing only certain users to access our Controller App. Finally, we will fix our NGINX configuration to make everything work smoothly through websocket connection.
Since 0.77 Home Assistant comes with securit on board. You can skip the configuration of OAuth2Proxy and rely on HASS instead.
Choose the right Controller App
![]()
On the home automation open-source market two projects have most of the attention, the Home Assistant mentioned earlier, and openHAB. The latter was created in Germany, around 2011, and it is written mostly in Java. HASS (Home Assistant) was started in 2013 and is written in Python. I decided to give HASS a go, as it have slightly more vivid community.
HASS installation
The easiest way to get started with HASS is to use its docker image. This way we don’t need to install lots of its dependencies and drivers directly on our Raspberry unit. We are going to start with docker installation. The fastest way to do so is by using get.docker.com page.
If you are control freak you should install docker manually, as running scripts from the web is not very secure.
pi@raspberrypi:~ $ sudo su
pi@raspberrypi:~ $ curl https://get.docker.com | sh
pi@raspberrypi:~ $ usermod -aG docker pi
pi@raspberrypi:~ $ systemctl enable docker
pi@raspberrypi:~ $ systemctl start docker
pi@raspberrypi:~ $ exit
Having docker up and running, we can go ahead and install the Home Assistant.
By default it will start on 8123 port. We also need to open this port
for traffic from local network on Raspberry firewall, to make testing easier.
pi@raspberrypi:~ $ docker run -d --name="home-assistant" -v /opt/hass:/config \
    -v /etc/localtime:/etc/localtime:ro \
    --net=host --privileged --restart always \
    homeassistant/raspberrypi3-homeassistant:latest
pi@raspberrypi:~ $ sudo ufw allow from 192.168.0.0/24 to any port 8123
pi@raspberrypi:~ $ sudo chown -R pi:pi /opt/hass
Note that I’ve also changed owner of the
/opt/hassdirectory. This will simplify configuration management later on.
The HASS server will store its configuration the /opt/hass directory.
As a design choice, creators of Home Assistant have chosen yaml format
for configuration files. While the service is being deployed feel free to
take a look at the main configuration file.
pi@raspberrypi:~ $ less /opt/hass/configuration.yaml
By default HASS is not secured. There is an option to secure it with password authentication but, I’d rather go with something more secure. The best security one can enable currently is to setup a small VPN service on Raspberry, and propagate certificates to all devices you want to use to access home remotely. However, VPN have its downsides, like heavy setup and poor user-experience. I decided to go with a two-factor authentication instead, thanks to Google generosity and their OAuth2 service.
Securing HASS with OAuth2

To achieve 2FA with HASS we will use Google as an Google OAuth2 authentication server.
To do so, you first need to obtain a valid Client ID and Client secret pair,
and configure a redirect URI. To do all those things you need an account in
Google Cloud (don’t worry, it’s free). Assuming you already have an account
in GCloud, go to the API > Credentials page: https://console.developers.google.com/apis/credentials
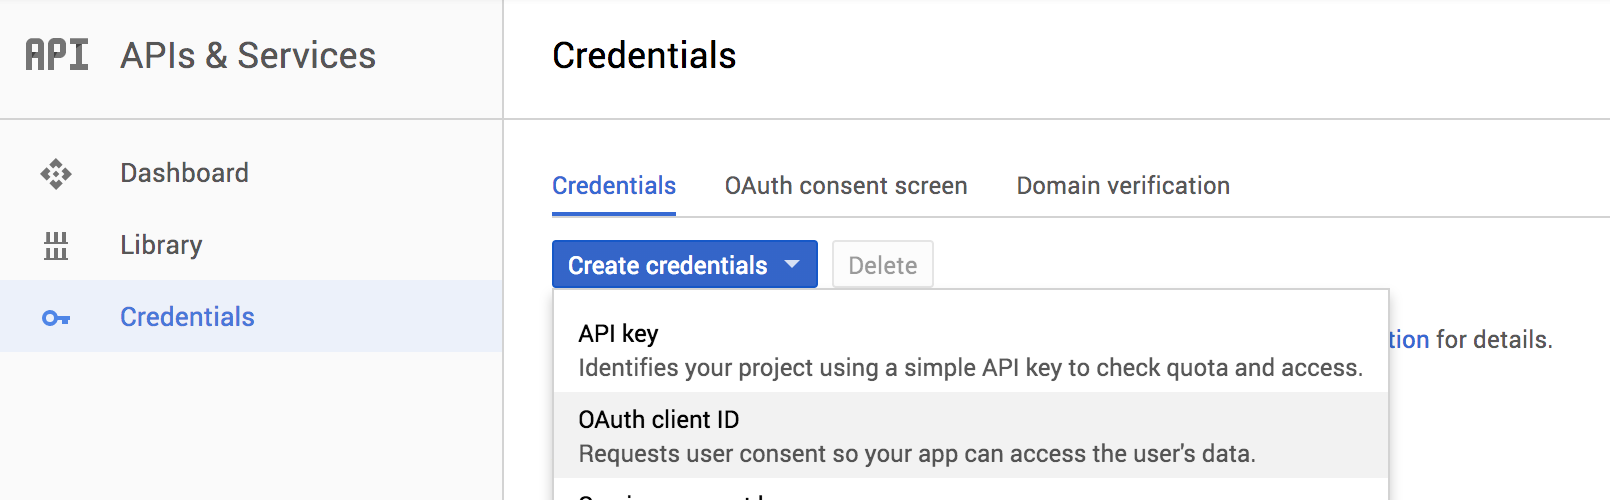
There, click Create Credentials > OAuth Client ID, select Web application
option, input some name and an Authorised redirect URIs: https://home.example.com/login/oauth2/code/google,
assuming home.example.com is the domain used in while setting up nginx in the part II.
Google will generate Client ID and Client secret for us. Store it somewhere, we will need those in a minute.
Next, we will install and configure the proxy. It is written in Java, using Spring Cloud (see source code here). We need to start with installation of new java version, following with creation of directories used by proxy.
pi@raspberrypi:~ $ sudo apt-get install oracle-java8-jdk -y
pi@raspberrypi:~ $ sudo mkdir /opt/oauth2proxy
pi@raspberrypi:~ $ sudo chown pi:pi /opt/oauth2proxy
pi@raspberrypi:~ $ mkdir /opt/oauth2proxy/config
Finally, we can download the application and create a configuration file. Inside, we will store credentials from Google Cloud, list of users that can access our home, your hostname and a key we will use later on, while integrating your home with the external services.
# This url downloads version 0.1.4 of the proxy. Replace 0.1.4 with choosen version to download a different one.
pi@raspberrypi:~ $ wget -O /tmp/archive.jar https://gitlab.com/api/v4/projects/gyatso-home-automation%2Foauth2proxy/jobs/artifacts/0.1.4/download?job=release
pi@raspberrypi:~ $ unzip /tmp/archive.jar -d /opt/oauth2proxy/
pi@raspberrypi:~ $ cat <<EOF > /opt/oauth2proxy/config/application.properties
CLIENT_ID=<Client Id from Google Cloud>
CLIENT_SECRET=<Client Secret>
USERS='foobar@gmail.com', 'john.mccain@gmail.com'
KEY=000-123123-0000-343434-12312 # Secret Key to be used for API access in automations
HOSTNAME=https://home.example.com # Your home hostname here
EOF
We could start the proxy now, but lets configure a system service
that will do this for us instead. We want proxy to automatically start and
restart in case of errors. To do so we will use systemd.
pi@raspberrypi:~ $ sudo su
root@raspberrypi:~ $ cat <<EOF > /etc/systemd/system/oauth2proxy.service

[Unit]
Description=oauth2proxy service
After=syslog.target

[Service]
Type=simple
ExecStart=/opt/oauth2proxy/app.jar
Restart=always
RestartSec=30
StandardOutput=syslog
StandardError=syslog
SyslogIdentifier=oauth2proxy

[Install]
WantedBy=multi-user.target

EOF
root@raspberrypi:~ $ exit
pi@raspberrypi:~ $ sudo systemctl daemon-reload
pi@raspberrypi:~ $ sudo systemctl enable oauth2proxy.service
pi@raspberrypi:~ $ sudo systemctl start oauth2proxy.service
As a last configuration step, before testing the proxy,
we have to reconfigure syslog, to have logs available in /var/log/oauth2proxy file.
To avoid log growing too big, we should also configure and enable logrotate.
pi@raspberrypi:~ $ sudo su
root@raspberrypi:~ $ cat <<EOF > /etc/rsyslog.d/25-oauth2proxy.conf
if $programname == 'oauth2proxy' then /var/log/oauth2proxy.log
if $programname == 'oauth2proxy' then stop
EOF
root@raspberrypi:~ $ cat <<EOF > /etc/logrotate.d/oauth2proxy
/var/log/oauth2proxy.log {
    rotate 7
    daily
    compress
}
EOF
root@raspberrypi:~ $ crontab -l | { cat; echo "2 4 * * * /usr/sbin/logrotate -f /etc/logrotate.conf"; } | crontab -
root@raspberrypi:~ $ exit
pi@raspberrypi:~ $ sudo systemctl restart rsyslog
Now it’s the time to open your home in a browser http://home.example.com.
After successful log-in through Google, the Home Assistant should start loading,
and timeout after a while, falling back to the login screen. The reason
why it’s not working fully yet, is that we also need to configure websocket
proxy on NGINX server which sits in front of our application.
NGINX websocket proxy
NGINX we have installed previously already have support for websockets build-in. The only challenging a little part is to configure it properly, passing correct headers. Let’s open the configuration and add few new things.
pi@raspberrypi:~ $ sudo nano /etc/nginx/sites-enabled/default

## At the top of the configuration add an upstream
upstream websocket {
    server 127.0.0.1:8080;
}

## inside server listening on 443 add new location
    location /api/websocket {
        proxy_pass http://websocket;
        proxy_http_version 1.1;
        proxy_set_header Upgrade $http_upgrade;
        proxy_set_header Connection "upgrade";

        proxy_set_header        Host $host;
        proxy_set_header        X-Real-IP $remote_addr;
        proxy_set_header        X-Forwarded-For $proxy_add_x_forwarded_for;
        proxy_set_header        X-Forwarded-Proto $scheme;
    }

## Finally restart the server
pi@raspberrypi:~ $ sudo systemctl restart nginx
Now reload the page in your browser. Home Assistant should load correctly, showing you all devices it discovered automatically.
Summary

Finally, after lots of configuration we managed to install and securely expose Home Assistant. This will be our starting Controller service. In the next part, we will dig into automated configuration management of Home Assistant and configure our first automation.