
 One of the biggest wins with Home Automation is integration with
cameras. Hey Google, who’s at the door? or show me the baby room
commands are not just cool - they are truly useful. Sadly, the most
popular home cameras (a.k.a. old phones none needs) are not
compatible with google cast.
In this post I will show you how to work-around this issue, tricking
Google Assistant to show us what we want, with just a little bit of
tinkering.
One of the biggest wins with Home Automation is integration with
cameras. Hey Google, who’s at the door? or show me the baby room
commands are not just cool - they are truly useful. Sadly, the most
popular home cameras (a.k.a. old phones none needs) are not
compatible with google cast.
In this post I will show you how to work-around this issue, tricking
Google Assistant to show us what we want, with just a little bit of
tinkering.One of the very first things I did, when embarking on a Home Automation adventure was reviewing all the scrap devices I had around the house. Three old phones got my attention almost instantly - after all, it’s a small computer with battery, low energy consumption, WIFI on board and a camera. Reusing those phones as IP Cameras integrated with Home Assistant is a piece of cake and instant win. The challenge however is to cast the feed from camera to cast-enabled device.
You might ask why it doesn’t work out of the box? Well, the video stream exposed through applications converting the phone to IP Cam is not compatible with streaming protocols that cast supports.
What we need

Our goal is to enable casting of feed from one of the phones working as an IP Camera using activate living room camera intend with Google Assistant. To do so, we need:
- An android phone (master). It should be at least Android 4. You can still dig up apps converting phone to IP Cam for Android 2 and 3 from the depths of internet, but we need few additional tools introduced in the Ice Cream Sandwitch to integrate with cast. If you can, root the device, as this will enable us to improve stability of the solution.
- Home Assistant, installed and running.
- Any number of additional phones (secondaries, optionally, can be older than Android 4). These phones will work as IP Cams only, without any additional tools.
- Cast-enabled device, it can be a Chromcast, Google Home Hub or a cast-compatible TV.
- Google Assistant. If you have an Android phone you have it already. If you don’t, pick one of the Google Home devices.
Home Assistant with Android IP Webcam
In the first part we will integrate Home Assistant with IP Camera app running on our master phone. You can do the same with any number of your secondaries. Theoretically, you don’t need to integrate HASS with IP Cam (hey, it’s IP Cam, it will be available either way) but I recommend to do so, as it will actually allow you to keep the Cams in local network and still be able to access them over the internet if you exposed your HASS instance.
Install IP Webcam
First, we need to convert our master phone to IP Webcam. To do so,
install the IP Webcam app.
You can go through the settings to customise quality of the stream to match
performance of your phone if you want to. Then, check the Stream on device boot flag
and press Start server. This should enable the camera, printing the URL address
on the screen, http://192.168.31.138:8080 in my case. Sadly, depending on
your phone, the app has tendency to crash after running for few days. To work around
this issue we need to restart the device daily. In order of doing so automatically,
you need to root the device. Then, install Tasker
or MacroDroid
(free alternative, although for casting we going to need Tasker either way).
Using the new application you can set a clock-based trigger to restart the device daily.
Integrate camera with HASS
![]()
In order to integrate your camera with HASS we need to setup the Android IP Webcam component. This component, in addition to exposing video stream also allows you to read and manipulate certain features of your phone. Depending on the setup, you might find useful ability to turn on the torch and switch between front and back cameras.
# Example configuration.yaml entry
android_ip_webcam:
  - host: 192.168.31.138
    name: Living Room Camera
    sensors:
      - battery_level
      - battery_temp
      - video_connections
      - motion
    switches:
      - ffc
      - torch
    motion_sensor: true
After restarting/reloading the configuration in HASS you should see
your device named camera.living_room_camera and few additional
sensors and switches. To improve UX of battery level sensor you may also
add custom indicator with a nice icon:
# Example configuration.yaml entry
sensor
- platform: template
  sensors:
    living_room_camera_battery:
      friendly_name: "Living Room Camera Battery"
      value_template: '{{ states.sensor.living_room_camera_battery_level.state|default(0) }}'
      unit_of_measurement: "%"
      icon_template: >
        {% set battery_level = states.sensor.living_room_camera_battery_level.state | default(0) | int %}
        {% set battery_round = (battery_level / 10) |int * 10 %}
        {% if battery_round >= 100 %}
          mdi:battery
        {% elif battery_round > 0 %}
          mdi:battery-{{ battery_round }}
        {% else %}
          mdi:battery-alert
        {% endif %}
Cast integration
In the second part of the article we will integrate our camera with google assistant.
The solution consist of several puzzle pieces we need to put together. First,
we need to configure Google Assistant
component in HASS, to feed Google Home with our devices. We will use
master phone as a driver for cast, so we need a way to pass commands
from HASS to our phone. You can use Tasker plugin for it, although it
exposes phone through the internet. Alternatively, you can use push
feature, for example through Pusher.
I however was already using Slack Integration so that’s my choice.
Finally, we need the AutoCast
plugin for Tasker (costs around $2, it’s worth it). The whole trick is
that instead of feeding cast with video stream that it can’t read,
we will cast a webpage with MJPEG stream, exposed under
http://192.168.31.138:8080/browserfs.html through IP Webcam.
Master phone configuration
To cast our camera we will use Tasker with AutoCast plugin.
After you install both apps on the master phone, open Tasker and go
to the TASKS tab. Here, add a new task named cast living room.
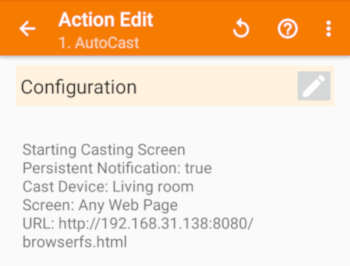
Inside add an action - search for Plugin category, AutoCast plugin
and finally select AutoCast action. Edit it to pass configuration options,
choose your cast-enabled device and from Screen menu pick Any Web Page. Finally, go to the
Any Web Page elements and type URL of your cam: http://192.168.31.138:8080/browserfs.html.
Now press play to test your config. If everything is ok your selected screen
should show you the stream from the camera!
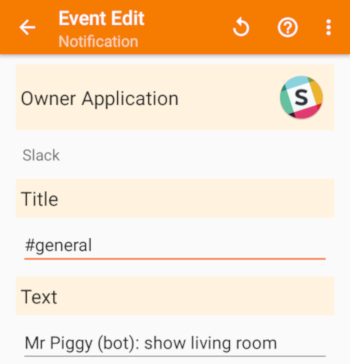
Now we need to configure the trigger that will make our phone cast the video stream. Open Profiles card in Tasker and add a new profile of Event type. Search for UI option, and inside select Notification. Choose your application (Slack in my case), and specify data that will allow Tasker to match particular notification to action. You can use different messages to trigger different actions, which is useful if you plan to add some secondaries android based cameras. Along the way you will be prompted by Tasker to grant extra permissions to read notifications. Having master phone ready we can now move to the HASS configuration.
Google Assistant and HASS integration
First, we need to integrate HASS with our master phone. To do so, I’ve used the Script Component sending notification through Slack to my phone.
script:
  living_room_camera:
    alias: Living Room Camera
    sequence:
    - service: notify.slack
      data:
        message: "show living room"
Now it’s time for possibly the most time-consuming step. Although, integration of Home Assistant with google is described really well on the component page so you shouldn’t have any problems with it.
After you finish integrating with Google Assistant I recommend turning off
expose_by_default flag to avoid flooding Assistant with our devices, and
instead list only the stuff we want. In this case it will be the
script.living_room_camera
google_assistant:
  project_id: home-assistant-6f498
  api_key: !secret home_graph_api_key
  expose_by_default: false
  entity_config:
    script.living_room_camera:
      expose: true
By design, scripts are exposed to Google Assistant as Scenes. To activate
a scene you can say turn on <scene> or simply activate <scene>.
Summary

Finally, you can say Hey Google, activate living room camera to enable streaming of your camera to your cast-enabled device.
This trick can be used to stream pretty much anything that can be processed by browser. If you have questions or ideas how to improve this setup, feel free to drop a comment below.