Serverless technology is an enabler to build complete and scalable system quickly, running at low cost, without having to worry too much about infrastructure. If you are using AWS, with several simple changes and additions you can also have Business Intelligence in your project, using the same pricing model as the Lambdas - you pay only for what you use.
But wait, what’s Business Intelligence?
Let’s assume you run a food delivery system. People can register and order a meal from any of the supported restaurants to be delivered at their doorsteps anywhere in your city. If you add a Business Intelligence (BI in short), into your system, it can give you answers to questions such:
- Which district have too few deliverers, which has too many?
- When you should hire extra deliverers to avoid clients waiting too long?
- Which restaurants are key value to your business providing best profit?
What’s best, assuming if BI is build properly, all these questions and many others can be answered without changing a single line in your codebase.
As with every feature, there is a best time to start thinking about adding the BI to your system. From my experience, a project should start with most valuable features allowing the creators to ensure funding. If MVP is enough to start selling, second most important thing is to focus on the monitoring and alerting. If project can be monetized and there is an alert when something goes wrong - that’s the perfect time to start focusing on BI.
You need data to flow
Business Intelligence and rivers are very much alike. Both have their sources in small streams. Both are created
as a result of merging these streams. To provide this source you need to decorate crucial parts of your system with
a logic that will build and send Data Objects. A Data Object is a reflection of state change in your application.
For example, consider simple flow of courier picking up the food in restaurant and delivering it at the client doorstep.
You could send two events here, a food-pickup
{
  "type": "food-pickup",
  "version": "1.0.0",
  "createdAt": "2018-05-28 15:04",
  "courierId": "1234-123-1234",
  "restaurantId": "345-2345-345",
  "restaurantCords": "51.1096089,17.0317273",
  "clientId": "423-2345-234"
}
and food-delivery
{
  "type": "food-delivery",
  "version": "1.0.0",
  "createdAt": "2018-05-28 16:04",
  "courierId": "1234-123-1234",
  "restaurantId": "345-2345-345",
  "clientCords": "51.1110508,17.0223965",
  "clientId": "423-2345-234",
  "status": "DELIVERED"
}
type,versionandcreatedAtcan be considered as headers of your data objects
Pickup and delivery events will allow you to start building the diagrams with the time needed to deliver, depending on the time of the day and the city district. You can also build heat-maps to determine if more couriers should be hired, or use this data retrospectively building reliable estimates of your delivery time.
Implementation
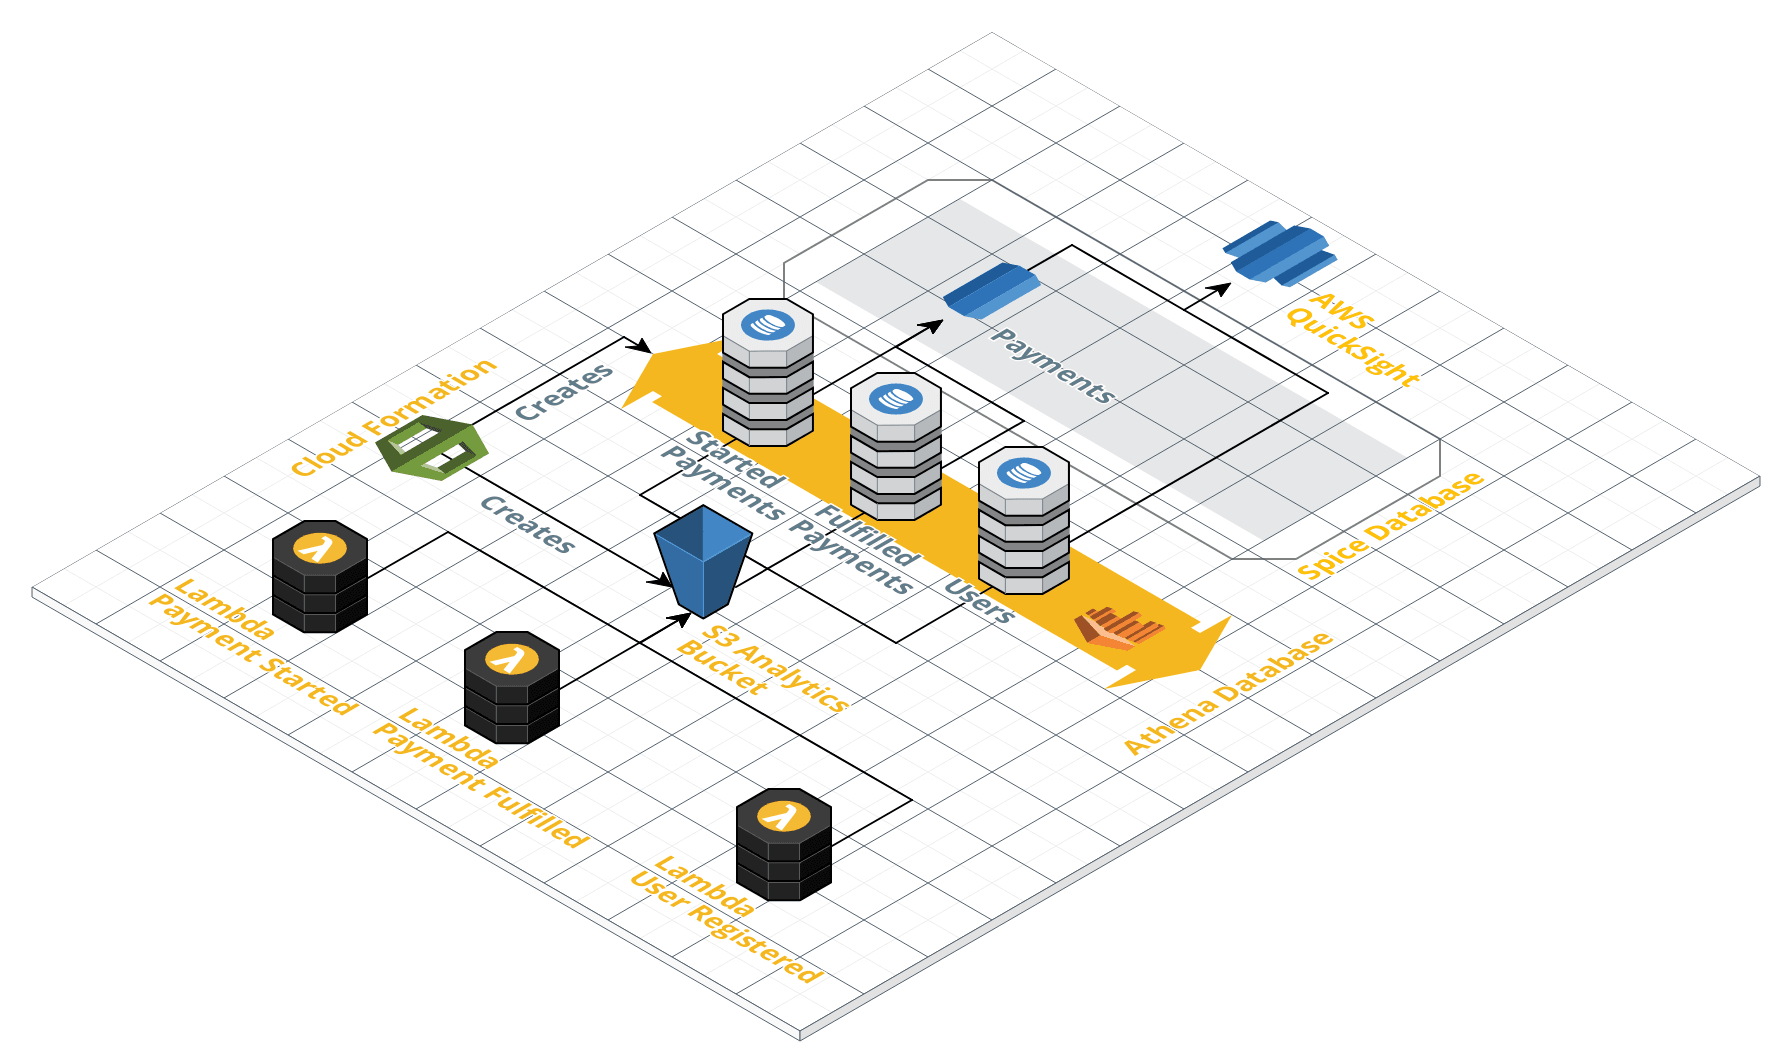
To build the final solution we will use several AWS services. First of all, a S3 bucket to store our data objects. Athena service will be reading them, providing an abstraction, enabling us to query data in S3 using SQL. This will be consumed by AWS Quicksight service, in a form of digestible diagrams and metrics. Finally, we will utilise CloudFormation, to avoid creating these resources manually where possible.

Cost considerations
For majority of the services we will pay only for what we use, at small rates. And so, CloudFormation is free. For S3 we will pay only for the storage ($0.023 per GB) as the transfer between services within the same AWS zone is free. Athena has simple pricing of $5 per TB of data scanned with 10MB steps. The only exception is Quicksight, with its monthly payment that depends on a number of users and size of the cache (SPICE) you want to use. Thankfully, first user is for free, along with 1GB of cache.
Producing data
There are two approaches you can take when it comes to the decision how to produce data. You can either write to S3 directly from your functions, or invoke different one to do so. The second approach comes handy with the scale of the projects. If there are multiple teams producing data from hundreds of functions, an additional abstraction layer helps ensuring consistency. As my project is relatively small I decided to allow my functions to write directly to my analytics bucket on S3.
For this part, we need to create an additional, analytics bucket. Serverless framework is integrated with CloudFormation
so it’s as easy as adding an extra resource into your resources: declaration. Because in the following parts we will be adding
quite a lot of resources, it’s a good time to split our declaration into separate files, to avoid serverless.yml
growing too big. To do so we will use simple trick:
serverless.yml
resources:
  - ${file(cloudformation/analytics.yml)}
  - ${file(cloudformation/resources.yml)}
cloudformation/analytics.yml
Resources:
  AnalyticsBucket:
    Type: AWS::S3::Bucket
    Properties:
      BucketName: foodelivery-${opt:stage}-analytics
cloudformation/resources.yml
Resources:
  # the rest of your resources here...
We want our functions to write data objects into
s3://foodelivery-${opt:stage}-analytics/${event.type}-${event.version}/${partition}/ location.
The bucket name here is self-explanatory, that’s the bucket we just created. The name of the first directory is build
from event type and event version fields. This approach will enable us to have different tables per event version, making
schema maintenance easier. Finally, the last part is a partition. By partitioning our data, we can restrict the amount of
data scanned by each query, thus improving performance and reducing cost. Most obvious choice for the partition key is by date, and
we will follow this pattern. The name of file does not matter, we can set it to a timestamp. Summarizing, the event
registration in version 1.0.0, sent at 20:12, 28/05/2018 on the production account will go into
s3://foodelivery-prod-analytics/registration-1.0.0/dt=2018-05-28/1527541353061.json location.
Let’s prepare a service we will use to store these events, making our implementation cleaner. Here is an example in javascript, with manual date formatting:
import * as AWS from "aws-sdk";
import {Config} from "../../../resources/config";

export default class AnalyticsService {

    constructor() {
        this.s3 = new AWS.S3();
    }

    async storeEvent(event) {
        let now = new Date();
        return this.s3.putObject({
            Bucket: Config.analyticsBucket,
            Key: `${event.type}-${event.version}/dt=${this.partitionKey(now)}.json`,
            Body: Buffer.from(JSON.stringify(event)),
            ContentType: 'application/json'
        }).promise();
    };

    partitionKey(now) {
        return `${now.getUTCFullYear()}-${this.pad(now.getUTCMonth() + 1)}-${this.pad(now.getUTCDate())}/${now.getTime()}`;
    }

    pad(num) {
        return ("0" + num).slice(-2);
    }

}
Building tables
Having our system producing the data objects we need, we can setup a database and tables in AWS Athena. To do so, we
will use CloudFormation. Note, that creation of databases and tables in Athena is assigned to the AWS::Glue scope. AWS Glue
is a fully managed ETL (extract, transform, and load) service that allows you to categorize your data, clean it, enrich it,
and move it reliably between various data stores. It can be also used to derive schemas of your tables in the database automatically,
however this feature is far from perfect (eg. lack of support for date type fields in json documents). Instead of relying
on the Glue heuristic we will create tables from CloudFormation.
cloudformation/analytics.yml
  AthenaDatabase:
    Type: AWS::Glue::Database
    Properties:
      DatabaseInput:
        Name: foodelivery${opt:stage}
        Description: Database for Big Data
      CatalogId:
        Ref: AWS::AccountId
  PaymentRequestedTable:
      Type: AWS::Glue::Table
      Properties:
        TableInput:
          Name: payment_requested_1_0_0
          TableType: EXTERNAL_TABLE
          PartitionKeys:
            - Name: dt
              Type: date
          StorageDescriptor:
            InputFormat: 'org.apache.hadoop.mapred.TextInputFormat'
            OutputFormat: 'org.apache.hadoop.hive.ql.io.HiveIgnoreKeyTextOutputFormat'
            Columns:
              - Name: type
                Type: string
              - Name: version
                Type: string
              - Name: createdat
                Type: timestamp
              - Name: amount
                Type: int
              - Name: customerid
                Type: bigint
              - Name: purchaseid
                Type: bigint
            SerdeInfo:
              Name: JsonSerDe
              Parameters:
                paths: 'type,version,createdAt,amount,customerId,purchaseId'
              SerializationLibrary: 'org.openx.data.jsonserde.JsonSerDe'
            Location: s3://foodelivery-${opt:stage}-analytics/payment-requested-1.0.0
        DatabaseName:
          Ref: AthenaDatabase
        CatalogId:
          Ref: AWS::AccountId
The PaymentRequestedTable is an example of mapping for event:
{
  "type": "food-pickup",
  "version": "1.0.0",
  "createdAt": "2018-05-28 15:04:22",
  "amount": 3400,
  "customerId": 1234,
  "purchaseId": 234
}
After creation of the database, providing your application produced some events already, we can query our new table using Athena. However, you will not see any data yet. That’s because every time a new partition is created we must manually inform Athena service. To do so run:
MSCK REPAIR TABLE payment_requested_1_0_0;
Now, everything should work as expected:
| type | version | createdat | amount | customerid | purchaseid |
|---|---|---|---|---|---|
| payment-requested | 1.0.0 | 2018-05-28 15:04:22.000 | 3400 | 1234 | 234 |
Refreshing partitions automatically
Refreshing partitions manually every day seems like a tedious work we should automate, isn’t it? We could use AWS Glue to do so (in fact if we have auto-discovery it will refresh partitions, providing we run it on a schedule), but that will generate excessive costs. Instead, we can write a simple lambda triggered on a scheduler. Running queries requires quite a lot of permissions, thankfully we can use IAM Managed Policies to simplify our configuration.
provider:
  iamManagedPolicies:
    - arn:aws:iam::aws:policy/AmazonAthenaFullAccess
    - arn:aws:iam::aws:policy/AmazonS3FullAccess
functions:
  analyticsPartition:
    handler: src/js/controllers/analytics.partition
    events:
      - schedule:
          name: foodelivery-${opt:stage}-createpartitions
          description: Scheduled partition create
          rate: rate(1 hour)
The AWS Athena SDK allows us to run queries only in an asynchronous manner. To get the results we need to pull the
query status till it’s finished. So, to refresh partitions first we need to list all tables in our database,
and then table by table run the MSCK REPAIR query. Here is an example implementation in javascript of the partition
refreshing service:
import * as AWS from "aws-sdk";
import {Config} from "../../resources/config";

export default class AthenaService {

    constructor() {
        this.athena = new AWS.Athena();
    }

    async refreshPartitions() {
        let result = await  this._executeQuery(`SHOW TABLES IN ${Config.athenaDB}`);

        result.ResultSet.Rows.forEach(async row => {
            console.log(`Refreshing partitions in ${row.Data[0].VarCharValue}`);
            await this._executeQuery(`MSCK REPAIR TABLE ${Config.athenaDB}.${row.Data[0].VarCharValue}`);
        })
    }

    async _wait() {
        return new Promise((resolve) => {
            setTimeout(() => resolve("wakeup"), 1000)
        });
    }

    async _executeQuery(query) {

        let startedQuery = await this.athena.startQueryExecution({
            QueryString: query,
            ResultConfiguration: { OutputLocation: `s3://${Config.analyticsBucket}/Manual/` }

        }).promise();
        let state = 'RUNNING';
        while (state === 'RUNNING') {
            let result = await this.athena.getQueryExecution({ QueryExecutionId: startedQuery.QueryExecutionId }).promise();
            state = result.QueryExecution.Status.State;
            await this._wait();
        }
        return this.athena.getQueryResults({ QueryExecutionId: startedQuery.QueryExecutionId }).promise();
    }
}
Connecting Quicksight
Connecting Quicksight to Athena is pretty straightforward. After logging in go into Manage Data screen and create
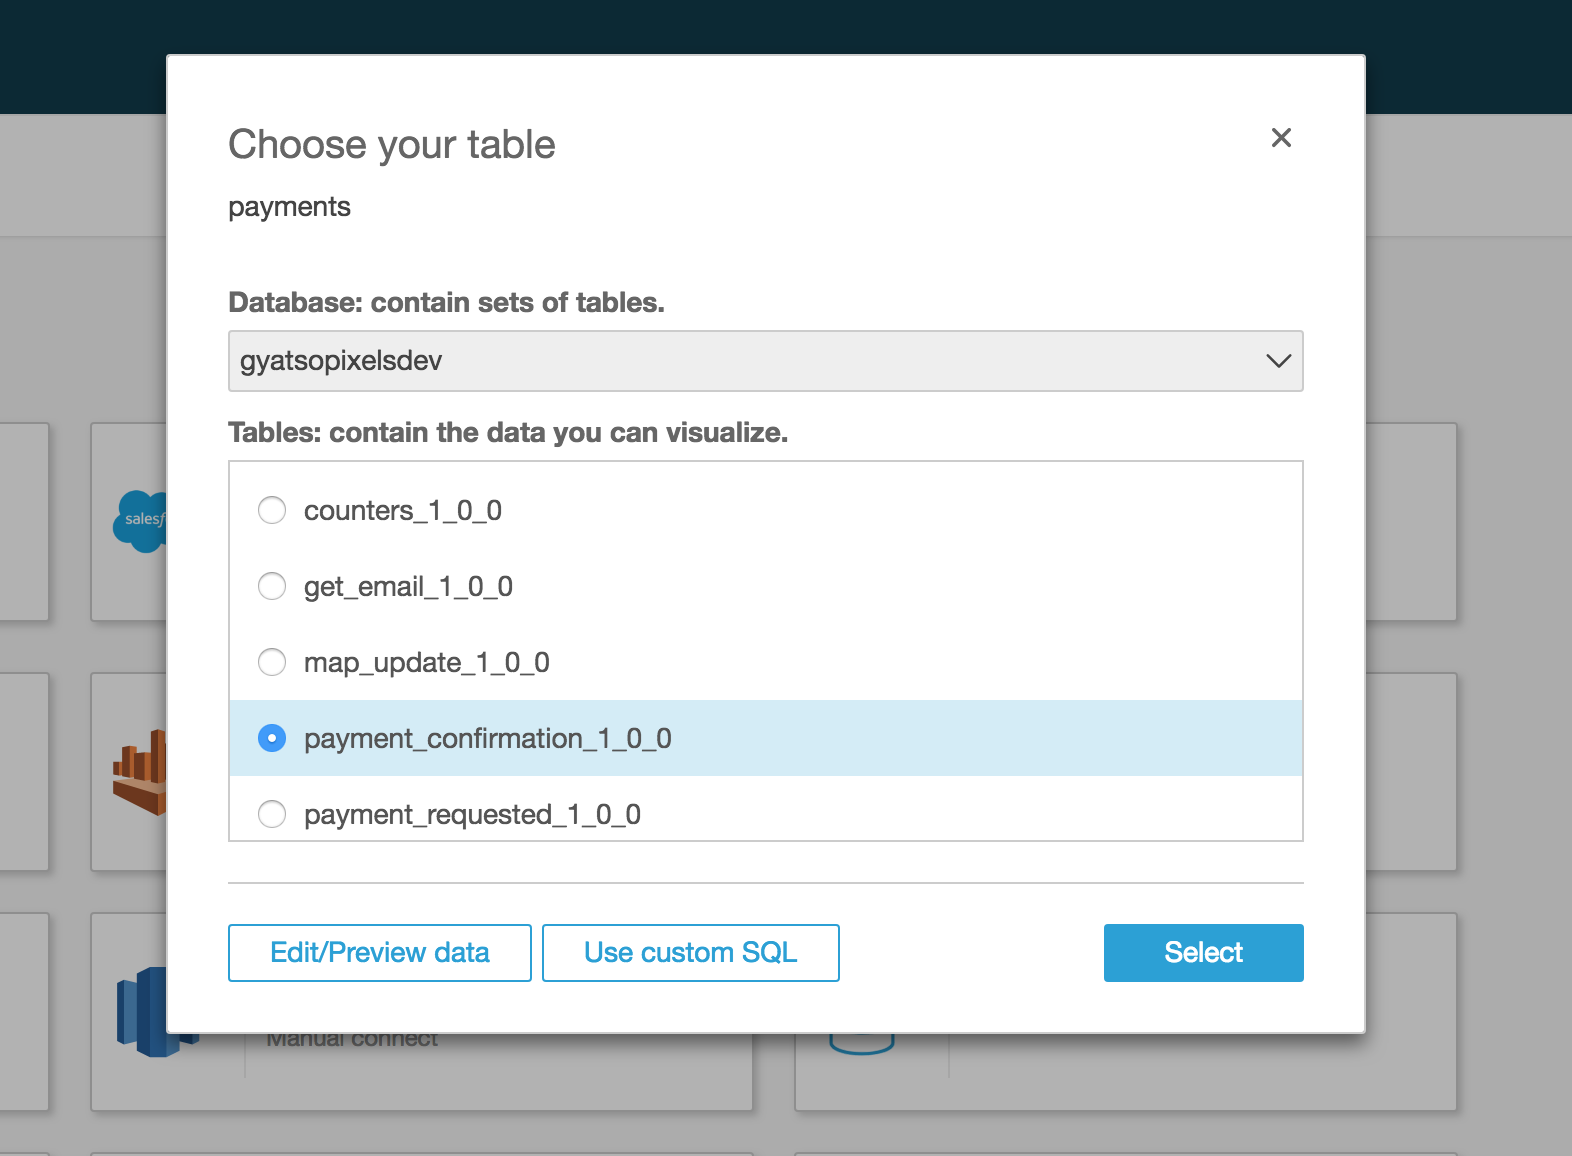
new data set using Athena as source of your data. Choose your database and one of the available tables.

You can now press select and go directly to the screen where you will be given choice between using
SPICE cache layer or directly querying Athena but instead, press Edit/Preview data to open
more advanced settings. Here, you can select more than one source tables, define joins between then as well
as extra calculated fields using set of supported functions. When you are done, press the Save & visualize button.

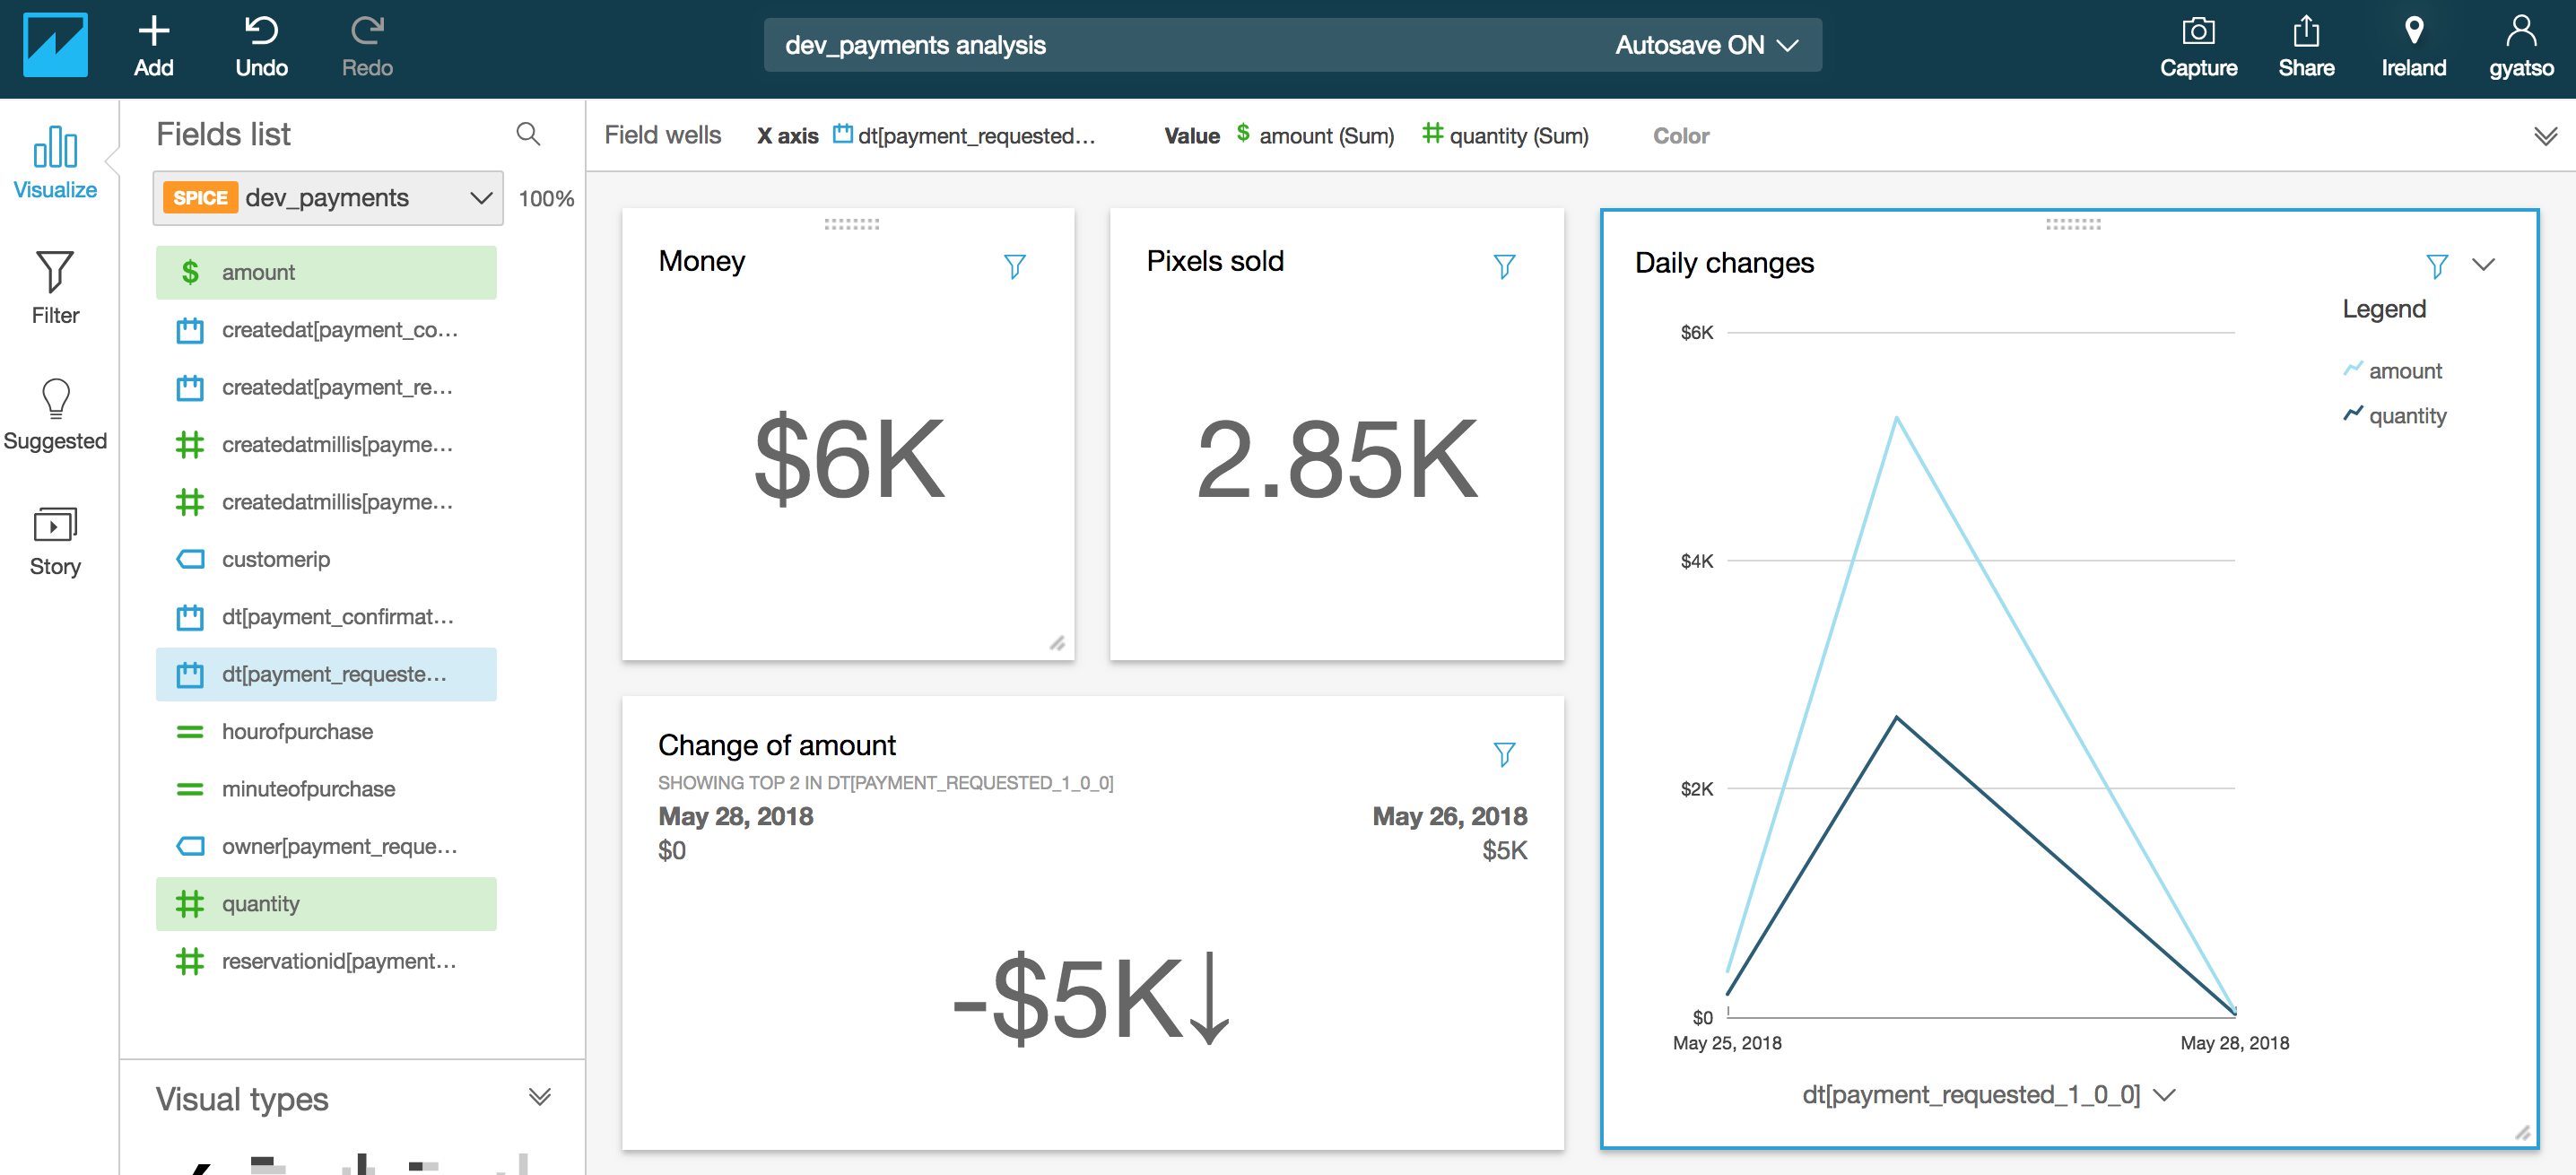
Spend some time here creating visualisations that might be useful to you. In my example project, I count the sum of earning, their distribution over the selected date range and some KPI’s.
Any alternatives to Quicksight?
Business Intelligence market is overflowing with solutions right now. Unfortunately, most of them are pretty steep, not offering even the first user for free as AWS does. Currently, Quicksight has one very dangerous competitor - Google DataStudio. These two services are slightly different, as DataStudio is only a presentation layer so any transformations of the data and schemas must be done on BigQuery side. However, DataStudio has one big advantage over Quicksight - it is free to use. There is a possibility to connect DataStudio with AWS Athena, using mechanism of Community Connectors. The only challenge here is that connectors must be written using Google App Scripts, which makes using AWS SDK impossible, so you either have to reimplement it (see this example project) or expose certain actions through lambdas.
Summary
Getting Business Intelligence running on AWS is simple and cheap. I you want to dig deeper in the subject, there is also a number of optimisations you can make to speedup queries and lower the costs, described on the AWS Blog. Furthermore you could dig deeper into AWS Glue to make preparation of your data for analytics purposes easier.
