Nowadays building a Smart Home is an art of compromises. One can either spend lots of bucks and get a coherent system from one producer, or go big and build the devices from scratch, using AliExpress electronics. In the upcoming year I’m targeting for middleground here, neither spending a small fortune nor building my own hardware. This series describes my experiences of building a Smart Home armed in nothing more than programming skills and a limited budget.
Selecting the Heart of the System
I want my Home to be accessible from everywhere, be able to verify if my lights are on, access locally available resources like network drive and so on. This decision has possibly biggest influence over the design, as it requires having a publicly available device running at home and spending some extra time on securing the system. After all, I prefer not waking up at night because somebody on the other side of the globe decided to throw a party using my lights and vacuum.
![]()
I started with selecting a device to be a Controller for my home. As almost every IT specialist I already had some unused devices laying around in home. Originally I planned to use a spare laptop, but that option was quickly rejected as I don’t have one with passive cooling and low-energy consumption, which seems essential for such application. Then, I turned my attention to NUC (Next Unit of Computing) a small-form-factor personal computer designed primarily by Intel. Price of sensible units starts at around $250, which was way too much for building on a budget. I briefly reviewed the Mini PC Sticks but, finally following an advice from colleague I settled on Raspberry PI 3 model B.
Shopping list
Having selected the Raspberry as a heart of the system, complete list of what we’ll need follows:
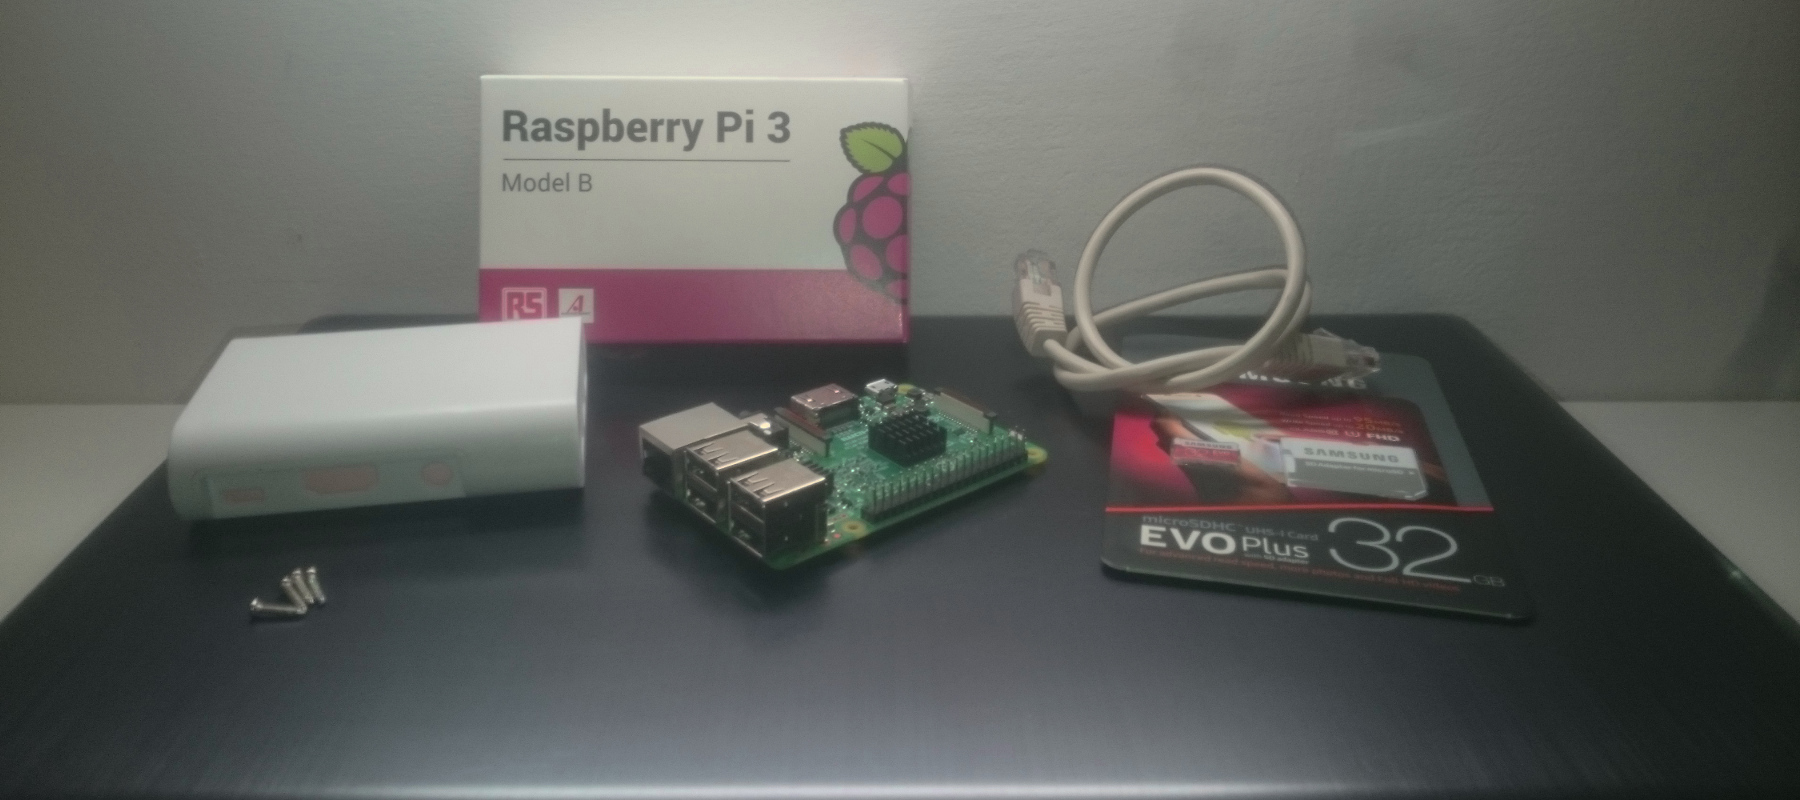
- Raspberry PI 3 model B
- Charger 5V/2.5A - the
2.5Aseems like a bit much, for starters standard phone charger with1.5Ashould be fine. However, with time the number of devices connected to Raspberry may grow as we will be extending the system, so if you have a possibility to buy a2.5Acharger - do it. - MicroSD card - Any card with at least 4GB of memory should do just fine. As Raspberry uses this card as a hard drive for the system, if you can pick one that offers high speed of random writes. Currently the best value to money offers the Samsung Evo+. We’ll also need an adapter to install operating system manager on this card. If you don’t have an adapter you can try using your phone as one.
- Keyboard (for setup only) - We’ll need a USB keyboard to install the operating system.
- Monitor or TV with HDMI input (for setup only) - For like 5 minutes of the first set up. We’ll enable
ssh daemonand continue configuration remotely. - RJ45 cable (optional) - If you can, connect your Raspberry directly to the router. The
WI-FIis working fine on the device, however the cable as usual provides more reliable connection. - Raspberry PI Case and Heatsink (optional) - You may want to hide the device inside a case. If you do, pick a Heatsink for better cooling of your device.
You should be able to get a Raspberry with charger for something around $50. The prices of Samsung Evo+ starts with $15 for a 32GB model.
Up and Running
Having the devices ready, we can start setting everything up. We’ll start with system installation, following with
ssh daemon setup, a http server installation with certs configuration and finally exposing everything to the internet, using a domain of your own.
Installing the Raspbian Lite
To get started with Raspberry Pi, we’ll need an operating system.
NOOBS (New Out Of Box Software) is an easiest operating system install manager for the Raspberry Pi.
To install NOOBS on your MicroSD card best follow this tutorial.
Having the card ready, insert it into your Raspberry, connect keyboard, monitor or TV, ethernet cable (optional) and finally the charger.
When the system boots, configure WI-FI connection if needed, select Raspbian Lite and start installation.
Raspian is a Debian based distribution, prepared for Raspberry Pi. Major difference between full distro and Lite version is
a graphic interface. I prefer the Lite version as my device will not be connected to any screen.
After selecting distribution NOOBS will download the system and install it. Depending on your network connection and MicroSD card speed it can take up to
several hours. When everything will be in place you will be asked to confirm restart, and the system will boot for the first time.
The default login/password pair is pi and raspberry. After logging for the first time we will start with changing the password,
enabling ssh daemon and setting a static IP address on the device.
> login: pi
> password: raspberry

pi@raspberrypi:~ $ passwd
Changing password for pi.
(current) UNIX password:
Enter new UNIX password:
Retype new UNIX password:
passwd: password updated successfully
pi@raspberrypi:~ $ touch /boot/ssh # Raspbian will enable ssh daemon if this file exists
pi@raspberrypi:~ $ sudo su
root@raspberrypi:~ $ cat <<EOF >> /etc/dhcpcd.conf
interface eth0
static ip_address=192.168.0.100/24
static routers=192.168.0.1
static domain_name_servers=192.168.0.1
EOF
root@raspberrypi:~ $ exit
pi@raspberrypi:~ $ sudo reboot
After the reboot you can disconnect both screen and keyboard, and hide your Raspberry somewhere - my lays next to router.
Securing the Raspberry
I want by Raspberry to be available from the internet ssh protocol.
Securing ssh access is an important step, especially considering the number of bots consistently scanning the network,
brute-forcing into the servers. Several easy to do things should help us in achieving acceptable level of security.
“S stands for Security in the IoT”
We are going to enable ssh key authentication, disable the password authentication and disable ability to login into root account remotely.
It’s time to open your computer, a terminal and ssh into Raspberry using our new password for the first (and last) time.
mariusz:~ $ cat ~/.ssh/id_rsa.pub # Print your public key, if stored in default localisation
ssh-rsa AAAAB3NzaC1yc2EAAAADAQABAAACAQDaDJ... mariusz@local
mariusz:~ $ ssh pi@192.168.0.100
pi@raspberrypi:~ $ mkdir ~/.ssh
pi@raspberrypi:~ $ chmod 700 .ssh
pi@raspberrypi:~ $ echo "ssh-rsa AAAAB3NzaC1yc2EAAAADAQABAAACAQDaDJ... mariusz@local" > .ssh/authorized_keys
pi@raspberrypi:~ $ chmod 600 .ssh/authorized_keys
pi@raspberrypi:~ $ sudo su
root@raspberrypi:~ $ cat <<EOF >> /etc/ssh/sshd_config
PermitRootLogin no
ChallengeResponseAuthentication no
PasswordAuthentication no
EOF
root@raspberrypi:~ $ exit
pi@raspberrypi:~ $ sudo service ssh restart
pi@raspberrypi:~ $ exit # Now log out and log in again. This time ssh
                        # should log you in without prompting for password,
                        # using your ssh key instead.
mariusz:~ $ ssh pi@192.168.0.100
Summary
We configured a Raspberry that is going to be a heart of our home automation system. This device will be running code we are going to write to automate the home devices. In the next part, we’ll make the Raspberry available through the internet, both through the ssh and https.